Jumping straight into painting your wood surfaces might seem tempting, but it can lead to poor results. Without proper preparation, the paint may not adhere (stick) properly to varnished surfaces, causing peeling, chipping, or uneven finishes. If you’re not sure where to start, this guide on how to remove varnish from wood can help.
There are no shortcuts here! This read will walk you through the steps of removing varnish from wood so you can achieve flawless and lasting paint jobs.
Preparing the Materials
Before starting your varnish removal, make sure you’ve got everything you need. The right tools and protective gear won’t just make your life easier, they’ll also help protect both you and the wood. Here’s your must-have list to get the job done right.
- Protective Gear:
- Safety goggles
- Gloves
- Dust mask or respirator (especially for chemical strippers)
- Cleaning Supplies:
- Soft cloth or rags
- Mild soap or wood cleaner
- Vacuum or dust brush
- Removal Tools:
- Sandpaper (coarse, medium, and fine grits) or a power sander
- Chemical varnish remover
- Paintbrush (for applying the remover)
- Scraper or putty knife
- Steel wool or scouring pad (for detailed areas)
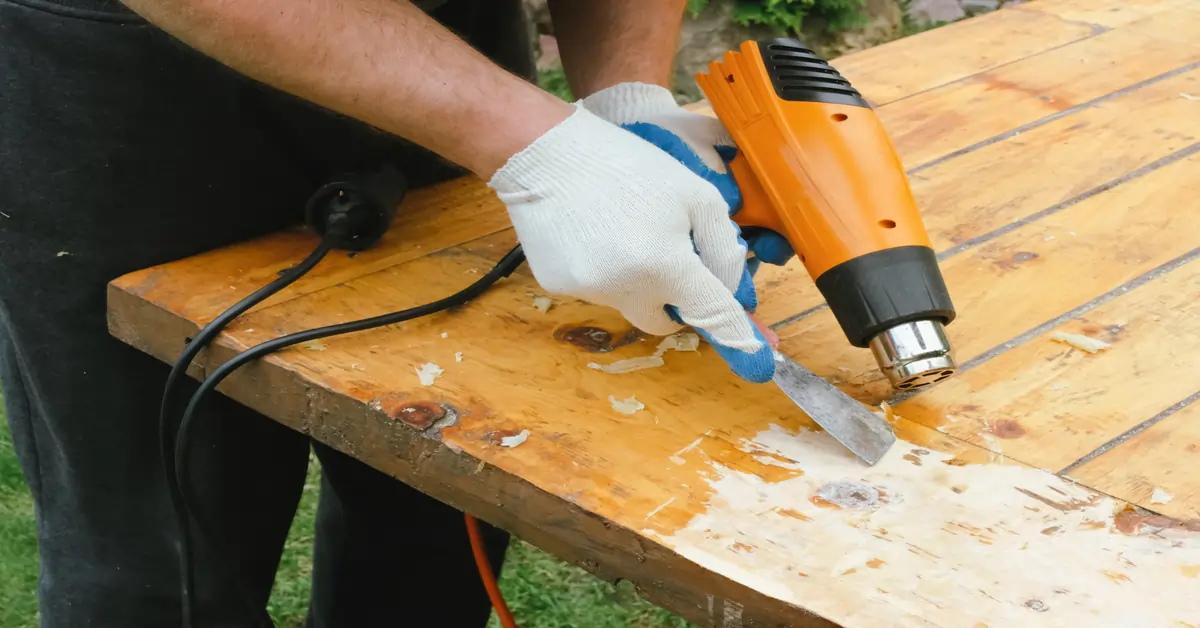
- Heat Stripping Tools (if using heat):
- Heat gun
- Scraper or putty knife
- Finishing Supplies:
- Tack cloth or damp cloth (for cleaning dust)
- Sandpaper (for smoothing after varnish removal)
- New varnish, stain, or paint (for refinishing)
Prepping the Surface
Now that you’ve gathered your supplies, there’s just one more thing to do before you start sanding: clean the wood surface. Dust, dirt, and grime (combination of grease and dust) can interfere with the removal process and make it harder for chemicals to penetrate the varnish evenly. Here’s why you should clean your surfaces:
- Removing surface dirt ensures that your varnish removal chemicals work directly on the varnish layer, making the process smoother and faster.
- Dust and debris can cause scratches or damage when using sandpaper or scrapers, leaving unwanted marks on the wood.
- A clean surface also helps the varnish remover to go on evenly on your surfaces so the varnish is removed consistently across the wood.
Applying the Varnish Remover
With your workspace prepared and your surfaces cleaned, the next step is to apply the varnish remover. Select a varnish remover that is suitable for wood, and make sure to follow the manufacturer’s instructions carefully. Using a brush or sponge, apply the remover generously over the varnished surface. Be thorough in your application.
The remover needs to penetrate and soften the varnish, so it’s important to apply a thick, even layer. After application, let the remover sit for the recommended time, typically 15 to 30 minutes, to allow it to break down the varnish. During this time, the varnish should begin to bubble or peel away from the wood surface.
Removing the Varnish
Once the varnish has softened, it’s time to start removing it. Use a putty knife or scraper to gently lift and scrape away the softened varnish. It’s important to work carefully to avoid damaging the wood beneath. If you encounter stubborn areas where the varnish doesn’t come off easily, you may need to reapply the varnish remover and wait a bit longer. In some cases, a combination of scraping and reapplying the remover might be necessary to fully remove all of the varnish. For more detailed areas, consider using a small brush or a fine-tipped tool to ensure that all varnish is removed without causing damage to the wood.
Cleaning the Wood for the Second Time
After you’ve removed the majority of the varnish, it’s crucial to clean the wood surface thoroughly. Dampen a rag or paper towel with a solvent and gently wipe the surface. Make sure to remove all traces of the varnish remover and any remaining varnish particles. This step is essential to prepare the wood for the next phase, as any residue left on the surface could affect the finish of any new coating you apply.
Sanding the Wood
Once the wood is clean and dry, the next step is to sand the surface. Use fine-grit sandpaper, such as 220-grit, or steel wool to gently sand the wood. Sanding will help eliminate any lingering varnish and create a smooth, even surface. Be sure to sand in one direction to avoid scratches. After sanding, wipe down the wood again with a clean, dry cloth.
Refinishing the Wood
Depending on your project, you can choose to apply a new coat of varnish, stain, or paint. The choice of finish will depend on your desired outcome and the specific requirements of your project. If you’re applying a new coat of varnish, ensure that the wood is completely dry before proceeding. For staining, ensure that the wood is well-prepared to achieve the desired color and depth. If painting, make sure to use a primer and apply the paint in thin, even coats for the best results.
Now that you know how to remove varnish from wood easily, just remember one thing: always choose quality materials. Good varnish removers, sandpapers, and finishes make a big difference. Invest more to get more. Choosing high-quality materials for your projects helps you get better results, makes your work last longer, and gives you a more professional look. Consider GI Paint and Varnish Remover!
GI Paint and Varnish Remover is a powerful, Methylene Chloride-based solution designed to help remove paint and varnish. Upon application, it causes the paint or varnish film to bubble, wrinkle, soften, and detach from the surface. It has a thick and fluid consistency, which makes it easy to apply even on vertical and upright surfaces. Use it for preparation during any renovation or restoration projects.
Uses:
- Stripping layers of paint from wood, concrete, and metal surfaces
- Removing varnish from wood surfaces
- Cleaning paint and varnish spills and spots
Application:
- Apply with a brush.
- Allow 5 to 15 minutes for the remover to react. Use a scraper or putty knife to easily remove the softened film.
Coverage:
Approximately 8 to 10 sq. m. per gallon, depending on the type of paint or varnish being removed.
Safety Precautions:
- Always follow the instructions on the packaging, as the substance is corrosive and can cause chemical burns, permanent injury, and scarring if not handled properly. When using it, be sure to wear a facemask, gloves, and protective clothing. Keep out of reach of children.
Packaging:
- 350cc bottle
- 3.75L rectangular can
For more information about the benefits and proper usage of varnish and paint removers, head over to the Island Chemicals website. Feel free to browse through a selection of articles and guides on how you can remove varnishes from surfaces furniture and prevent unwanted issues related to it.
References:
https://www.bobvila.com/articles/how-to-remove-varnish
https://www.workshop.bunnings.com.au/t5/Outdoor/How-do-you-remove-varnish-from-a-table/td-p/87198


